Search This Blog

Showing posts with label grout float. Show all posts

Saturday, January 2, 2016

Basic Tools You Need to Lay Tile

The basic tools needed to lay tile are available at Home Depot, Lowes and most tile stores.


Tile tools are pretty cut and dry, and the basic set of essentials will cost you about $100. I've taken photos of my tools for this blog  and these are not new tools  They have been well used  on a daily basis. These are the required tools to do a tile job in or around your home.  The wet saw is included but not required. All the cuts can be made with the 4 inch grinder and the tile cutting machine
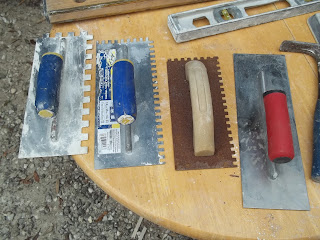
Tools necessary to lay tile for floors and walls

Tools for Laying Wall and Floor Tile

Picture 1: notched trowels used to spread thinset on floors and walls .The notches allow for consistent thicknesses of thinset before you lay your tile. from left to right the first is a 1/2 notched trowel used for natural marble and slate tile, The second is a 3/8 inch trowel for large format floor tiles. The third is a 1/4 inch notched trowel, The most common used for floor and wall tile. Finally there is a finishing trowel for skin coating  thinset smoothly on a surface.,
Tile Tools: Stone Chipping Hammer, Margin Trowl,Tile Nippers

Tile Tools: Stone Chipping Hammer, Margin Trowl,Tile Nippers


Picture two (2) shows from left to right, a stone chipping hammer for chipping concrete, flattening nails and basic hammering, which will be required every now and then. Then there is a margin trowel use for spreading thinset and mixing thinset in a bucket. The third tool is also a margin trowel bit it is a 1/4 inch notch margin trowel used to spread a consistent 1/4 inch thickness of thinset in corners and around edges. Finally there are tile nippers used to take small nips of tile off of the edge of cuts to make precise fits when cuts are just a bit too large to fit,
12 inch speed square and 6 inch speed square plus 2 levels

12 inch speed square and 6 inch speed square plus 2 levels

Picture three (3) shows 2 speed squares. One is a 12 inch square and the other is a 6 inch square used to draw straight square lines on tile to make cuts. There are also pics of two  levels . One 2 ft level and the other is a 4 ft level used to check rows of tile for levelness and also to keep lines straight.
Bag of spacers. Used to keep tile staight and lines even

Bag of spacers. Used to keep tile staight and lines even

Picture four  (4) shows a bag of spacers. These are very important  in the tool bag for keeping tile     straight and lines even.
Hand broom, tape measure, grout float and razor knife tile laying tools

Hand broom, tape measure, grout float and razor knife tile laying tools

Picture five (5 ) from left to right : the all important hand broom to keep all surfaces free of debris and dust before laying tile, On top, the tape measure, used often . In the middle, the grout float used to grout finished tile. Finally,  the razor knife to sharpen your pencil and also will be useful for many other tasks.
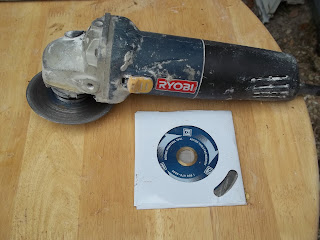
4 inch grinder with a 4 inch diamond blade

4 inch grinder with a 4 inch diamond blade

Picture six (6).  This picture is of a 4 inch grinder with a 4 inch diamond blade to cut tile. Very useful on the job and will cut tile ,stubborn toilet boltscopper pipe, steel  nd just about anything that hampers you from laying flat tile.

Hand Tile Cutting Machine

Picture severn (7) is a  hand  tile cutting machine for straight tile cuts and may take some time to master its use  but will really be helpful along walls where many cuts the same size are needed.

Picture of a tile cutter

Tile Cutter

Picture 8:  Another view of a tile cutter

Tile Cutter Ready to Cut Piece of Ceramic Tile

Tile Cutter Ready to Cut Piece of Ceramic Tile

Picture nine (9) a side view of a tile cutter with a tile on it ready to be cut

Picture of Wet Saw Used by Professional Tile Installers

Wet Saw Used by Professional Tile Installers

Picture ten (10)  is a wet saw used mostly by a professional tile installer and needed for any marble installation.
Picture of Wet Saw

Picture of Wet Saw

Picture 11. Another view of the wet saw

7 inch diamond bladee wet saw

7 inch diamond bladee wet saw

Picture 12:  Final picture of wet saw  equipped with 7 inch diamond blade
Picture of bucket used for mixing thinset

Bucket for water and mixing thinset.

Picture of sponge after using it to lay tile.

Sponge Used in Laying Tile

Sunday, January 19, 2014

Tile Installtion FAQ: Sanded Grout or Un-Sanded Grout?

Tile Installation and Tile Repair 

Most Frequently Asked Questions from Consumers:

  From Newly Forming FAQ on Tile Installation, Tile Repairs & All Things Tile Related:

Many people have asked me over the years which grout to use in their house particular to their tile installation. There is a simple answer to every question. Always use sanded grout whenever possible.
The industry standard states that un-sanded grout be used on grout joints 1/8  or less and sanded grout is used on grout joints 1/8 and larger up to 1/2 inch. So 1/8 inch grout joints can have sanded or unsanded (non sanded) grout applications. The reason sanded grout is always the best option in my opinion and experience is because it is undoubtedly much stronger and longer lasting. The reason being the sand in the grout acts like the gravel in concrete and binds the concrete together and keeps it from cracking. Unsanded grout doesn't have this binding strength and cracks and chips out over the long term and from my experiences doesn't last as long as a sanded grout. Some applications require a un-sanded grout when joints are too small for sanded grout to penetrate or in instances when sanded grout may scratch the installation material. Such materials as Marble, Travertine and soapstone are easily scratched and a sanded grout is not applicable [according to the manufacturer].  But anytime there is a choice between SANDED AND UNSANDED  grout, and sanded can be used, it would be advantageous to use the SANDED GROUT  whenever possible.

Below are pictures of examples installed this past week in Manchester MA of both sanded and sanded grout applications. As well as glass and 'metal mosaic tile that manufacturers recommend be installed with unsanded grout  But  I will explain how and why I used sanded grout for the installation.

Glass tile can be easily scratched when sanded grout is applied with a grout float especially when applied by an unskilled tilesetter. Manufactures recommend using the unsanded grout to install their product. But if sanded grout is applied with the hands and not a hard rubber float sanded grout can be used without scratching the tile giving the installation the long lasting strength that I would prefer in my home .
The advantage of  a UNSANDED  grout is that the finished product has a smooth finished  grout line, clean and smooth to the touch. Sanded grout ends up being rough like sandpaper to the touch.

I always try to bring my customers the highest quality installations at the most economical price , and for DIY and consumer readers with tile questions/concerns here on this blog I have the same philosophy; to bring my readers the information of options for both quality, longevity and economics

This is my opinion only based on years of tile experience. But other tile installation professionals may have different responses based on their training and experiences, so I welcome any to share their thoughts here with my readers. I want this to be a place where people can get help. 

Feel free any time to ask questions and inquires and I will do my best to help anyone in any country regarding any tile situation where my opinion can help you in making the best decision for your job. I realize my opinions are based on my experience, training and perceptions, so other professional tile installers may have different, not necessarily right or wrong just different than mine, so consider it one man's  make to make the best decision about your job  thanks.

Chris
   
Broke joint floor tile  with a 3/16 grout joint with sanded grout

1 inch hexagon marble which can be easily scratched by sanded grout using a rubber float
I hand grouted with sanded grout for strength

2 inch hexagon marble tile with a dot
easily scratched by sanded grout using a rubber float
hand grouted with sanded grout for strength
broke joint floor tile using a 3/16 grout joint and sanded grout

glass and metal mosaic tile recommended to use unsanded grout to prevent scratching
If hand  grouted carefully sanded grout can be used for strength  

glass and metal mosaic tile recommended to use unsanded grout to prevent scratching
If hand  grouted carefully sanded grout can be used for strength  

Featured Post

Home Renovation From Gut Rehab in Less Than 4 Months!

Home renovation finished products This house is a gut rehab ¹ job. My team and I started this project in April 2019 and it is now compl...

Our Most Popular Posts